VJS124, VJS144 “BIOS R0360ST” Update Program
Applicable Models
VJS124*, VJS144*
Applicable OS
Windows 11 Pro 64-bit
Applicable BIOS Version
If the BIOS version field shows a value other than “R0360ST”, please proceed as necessary.
[How to Check the BIOS Version]
- With the VAIO powered off, press and hold the [F3] key or the [F4] key, and then press the power button.
The “VAIO Rescue Mode” screen will appear.
- Select [Start BIOS setup].
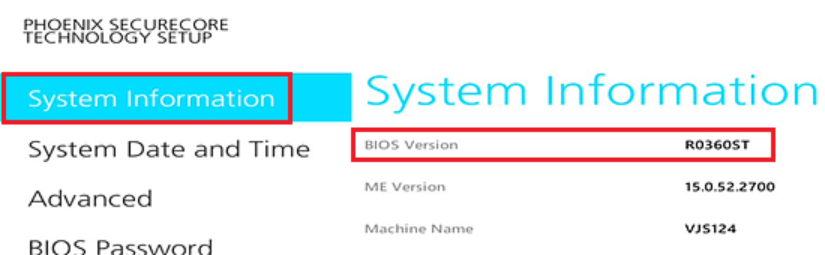
- The BIOS Setup menu will appear. Check the “BIOS Version” field under “System Information”.
Issues Resolved
- Fixed an issue where the system could unexpectedly shut down.
- This version also includes fixes for the following issues addressed in previous versions:
- Improved system stability.
- To address the “Absolute Persistence Module” vulnerability (CVE-2024-6364), the BIOS setting for Absolute Persistence Module has been changed to Disabled.
*If you are using the “Absolute Persistence Module” feature, you may continue using it with the setting enabled because this vulnerability does not affect that use case.
For more information about Absolute Persistence, refer to the following page:
https://www.absolute.com/platform/persistence
- Improved an issue in Windows 11, version 24H2, where the screen could take a long time to appear when the BitLocker Drive Encryption startup PIN setting was enabled.
- Fixed an issue where, when a mobile display (VJ5VP141*) was connected and the USB Charging setting in “VAIO Control Center” was set to “Off”, the VAIO logo would repeatedly appear and disappear on the mobile display after the PC was shut down.
- Resolved an issue where a tablet logon message was displayed on the lock screen.
- Improved an issue that prevented 5V Assist Charging from working.
- Supported the following Secure Boot KEKs and db updates:
- VAIO UEFI CA 2025
- Microsoft Option ROM UEFI CA 2023
- Microsoft Corporation KEK 2K CA 2023
- Windows UEFI CA 2023
- Microsoft UEFI CA 2023
 Notes
Notes
“KEK” and “db” for Secure Boot
If the Windows Secure Boot keys “KEK” and “db” have already been updated through Windows Update, you can continue using your system as is.
If “KEK” and “db” have not been updated through Windows Update, you can update them after the BIOS update by executing either “Restore Factory Defaults” or “Restore Factory Defaults (with 3rd Party UEFI CA)” under the “Secure Boot” settings in the BIOS.
However, do not perform “Restore Factory Defaults” unnecessarily, as doing so may result in the situations described below.
If you are unsure, we recommend waiting until “KEK” and “db” are updated through Windows Update.
- If BitLocker Drive Encryption or Device Encryption is enabled, you may be required to enter the recovery key. Before executing “Restore Factory Defaults”, back up the recovery key and suspend protection.
- Windows Hello PIN may become invalid. Before executing “Restore Factory Defaults”, confirm that you can sign in using your password. If the PIN becomes invalid, sign in with your password and reconfigure your Windows Hello PIN.
- Addressed the following vulnerabilities:
CVE-2025-47827: IGEL OS 10 and earlier (Linux-based operating systems) Secure Boot bypass vulnerability mitigation
CVE-2024-7344
CVE-2025-3052
INTEL-SA-01234 (CVE-2025-20064)
INTEL-SA-01247 (CVE-2024-45332)
INTEL-SA-01153 (CVE-2024-28956)
INTEL-SA-01097 (CVE-2024-24968)
INTEL-SA-01083 (CVE-2024-24853)
INTEL-SA-01071 (CVE-2023-41833, CVE-2023-23904, CVE-2023-22351, CVE-2023-25546)
CVE-2024-0762
CVE-2023-45229
CVE-2023-45230
CVE-2023-45231
CVE-2023-45232
CVE-2023-45233
CVE-2023-45234
CVE-2023-45235
CVE-2023-35841
CVE-2019-11098
INTEL-SA-00950 (CVE-2023-23583)
INTEL-SA-00929 (CVE-2023-32282)
INTEL-SA-00924 (CVE-2023-25756)
INTEL-SA-00814 (CVE-2023-27504, CVE-2023-28402)
INTEL-SA-00828 (CVE-2022-40982)
INTEL-SA-00813 (CVE-2022-44611)
CVE-2021-38578
INTEL-SA-00688 (CVE-2022-26006, CVE-2022-21198)
INTEL-SA-00601 (CVE-2021-33103, CVE-2021-33122)
INTEL-SA-00527 (CVE-2021-0091, CVE-2021-0103, CVE-2021-0107, CVE-2021-0111, CVE-2021-0114,
CVE-2021-0115, CVE-2021-0116, CVE-2021-0117, CVE-2021-0118, CVE-2021-0119, CVE-2021-0124,
CVE-2021-0125, CVE-2021-0156)
INTEL-SA-00561 (CVE-2021-0145)
INTEL-SA-00562 (CVE-2021-0157)
CVE-2021-28216
Download Procedure
At this stage, only download the file - do not run it yet.
- Create a folder to store the downloaded file.
*In this example, the folder is named “Update” and created on the C drive.
*Use only alphanumeric characters for the folder name. Using double-byte characters, spaces, or special characters may prevent the program from running correctly.
- Review the “Software License Agreement”.
- After reviewing, click the [Agree and Download] and download the update program to the folder created in step 1.
- After downloading the program, refer to the next section, “How to Apply Program and Pre-Application Checks”, to install the program.
- After applying the update program, delete the “Update” folder created in step 1.
How to Apply Program and Pre-Application Checks
■Pre-Application Checks
- On the first startup after applying this program, it may take 2 to 3 minutes for the system to start. During the first startup after the update, please wait until startup is complete and do not perform any operations.
- Once this program has been applied, you cannot revert to the previous BIOS version. This is to prevent known security vulnerabilities from being reintroduced. Thank you for your understanding.
- For BitLocker Drive Encryption and device encryption (standard OS encryption features), it is not necessary to decrypt. However, if you are using other drive encryption solutions, temporarily disable them or refer to their guidelines.
- Be sure to connect the AC adapter and power cable to the unit.
- Disconnect all peripheral devices.
- Sign in to Windows using a user account with “Computer Administrator” or “Administrator” privileges.
- The username must consist of alphanumeric characters only. If double-byte characters or spaces are used, create a new account with an alphanumeric username.
- Close all running applications.
- Temporarily stop any resident software such as antivirus programs.
- Configure the system, so it does not enter standby, sleep, or hibernation during the update.
- Do not restart or power off the system during the update.
- If a “User Account Control” or “Open File – Security Warning” dialog box appears during the process, review the contents and follow the on-screen instructions to continue.
- Confirm that your model is supported. Applying this program to an unsupported model may cause the update to fail or result in malfunctions.
■How to Apply Program
- Close all applications currently running on Windows.
- Open [PC (Computer)] – [Local Disk (C:)] – [Update] folder (the folder where you downloaded the file) and double-click the [SP000903.exe] file.
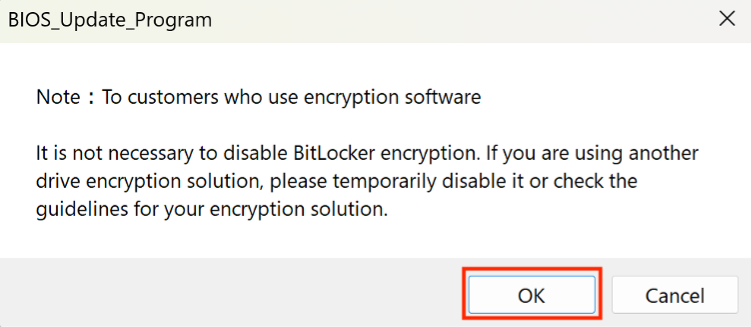
- The following dialog box will appear, so review the message and click [OK].
- When the User Account Control (UAC) screen appears, select [Yes] to begin applying the program.
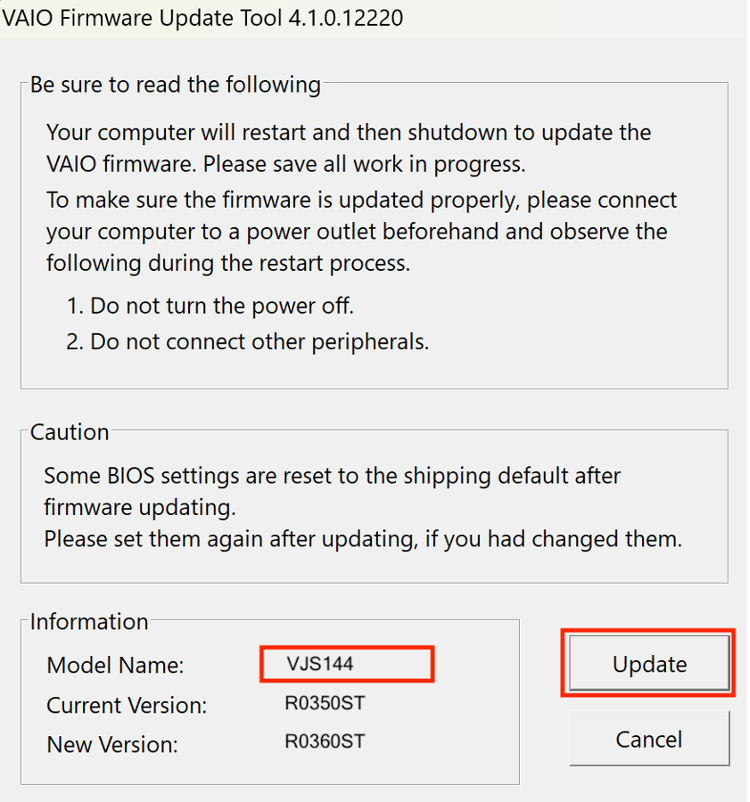
- When the following dialog box appears, confirm that the model’s name is included in the list of supported models for this update program, and then click [Update].
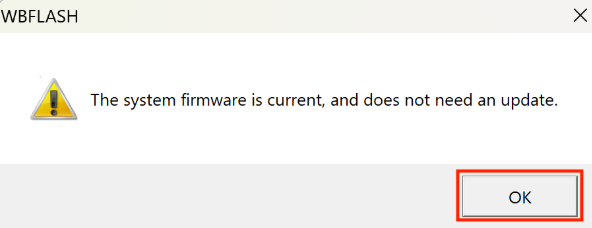
*If the following dialog box appears, this program has already been applied.
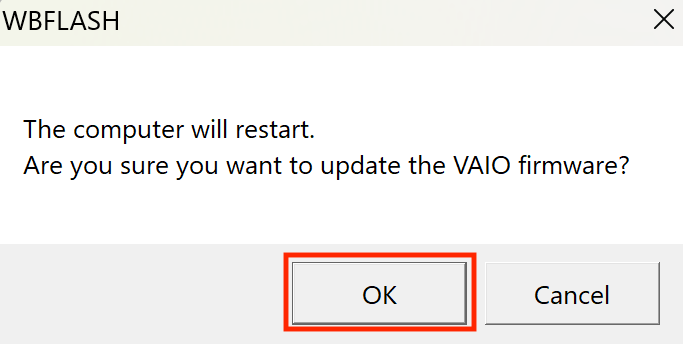
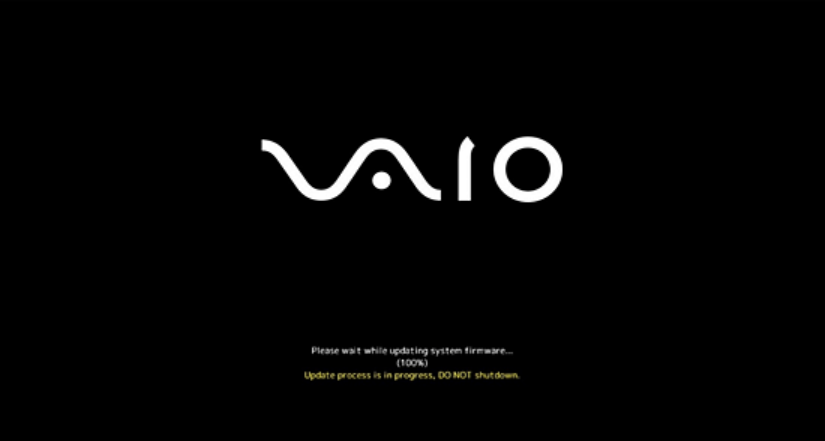
- When the following dialog box appears, select [OK]. The update will begin after the system restarts. When the update is complete, the system will shut down automatically.
Notes
- The system automatically restarts when the BIOS update begins and automatically shuts down when the update is complete.
Do not perform any operations until the update has been completed.
- During the BIOS update, the fan may start spinning, and the system may stop responding. If this occurs, please wait for a while.
- The BIOS update may take several minutes to complete.
- Make sure that the AC adapter is connected and never turn off the computer during the update process.
- On the first startup after applying this program, it may take 2 to 3 minutes for the system to start. During the first startup after the update, please wait until startup is complete and do not perform any operations.
After completing these steps, the process is finished.
Turn on the VAIO again and follow the steps in “How to Check if the Program Has Been Successfully Applied”.
How to Check if the Program Has Been Successfully Applied
- With the VAIO powered off, press and hold the [F3] key or the [F4] key, and then press the power button.
- The “VAIO Rescue Mode” screen will appear, so select “Start BIOS setup”.
- If the BIOS Version displayed under System Information is “R0360ST”, the update has been applied successfully.